
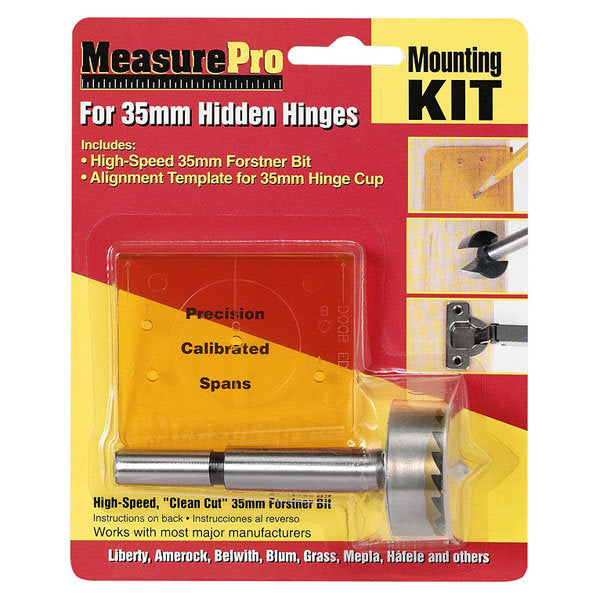
Measure Pro
MeasurePro Mounting Kit for 35mm Hidden Hinges
MeasurePro Mounting Kit for 35mm Hidden Hinges
Couldn't load pickup availability
In the world of woodworking, installing hidden hinges is a step up, if not two or three steps up, from installing cabinet hardware. More challenging, should we say.
The MeasurePro Mounting Kit for 35mm Hidden Hinges is a template/guide for marking the 35mm hinge cup as well as a “multi-spur” forstner bit. As for fastening the hinge to the cabinet frame, there are lots of different designs. But, this kit will handle the hinge cup part of the job.
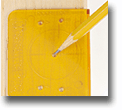 Step 1- Place the template/guide flush against the cabinet door and mark hole “C” for the hinge cup placement. Depending upon the brand of hinges you buy, use the holes marked “A” or “B” for the pilot holes, the two screws which hole the hinge cup in place. Certain brands use neither the “A” or “B” holes. For those, set the hinge cup in the 35mm hole you’ve drilled, make sure it’s square, and use the hinges holes to mark the places for drilling the pilot holes.
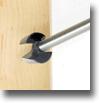
Step 2- Use the 35mm “multi-spur” forstner bit to drill the hinge cup hole making sure NOT to drill through the door. Once you’ve reached the top of the enlarged part of the drill head, you’re probably there. (tighten on the bit head)
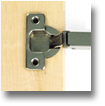
Step 3- Place the hidden hinge into the drilled hole and secure with pilot screws. If you notice a slight discoloration on the 35mm drill bit, it’s a special chemical used to prevent (or at least cut down on) corrosion often started with finger oils.
Add a title to introduce your product's features
Highlights
Provide details in each of the collapsible rows to give your customers the information they need to pick the best product.
Change the title and icon of each row to suit your brand.
Scent
Details
Ingredients
Feature a compelling customer review about your product or brand.
- CUSTOMER NAME HERE -
-
Multicolumn
Use a combination of images and text to share information about this product, and your brand.
-
Multicolumn
Consider adding information about your shipping and return policies.
-
Multicolumn
Consider highlighting your environmental commitments.
-
Multicolumn
Consider describing a money-back guarantee or highlighting your customer service.
Introduce other complementary products.
DESCRIBE HOW TO PAIR PRODUCTS TOGETHER
Image with text
Pair text with an image to focus on your chosen product. Add details on availability, style, or even provide a review.
Image with text
Pair text with an image to focus on your chosen product. Add details on availability, style, or even provide a review.
Image with text
Pair text with an image to focus on your chosen product. Add details on availability, style, or even provide a review.